Putting yoga inversions into your daily yoga practice is a scary concept to some people. I know that it was for me. You’re not sure where to start or which inversions would be best for you, but more importantly, you’re hesitant about the possibility of falling on your face. If you’ve been holding back for whatever reason, you can rest assured you’re not the only one with these fears. You can also rest assured that you won’t be the only one to ever fall on their face. But not to worry! Inversions can be intimidating at first, but even beginners can learn to do inversions of some sort and reap all the benefits they provide.
What Are Yoga Inversions?
In the simplest terms, a yoga inversion is any pose that puts your head below your heart. Inversions can range from the simple downward-facing dog (bet ya didn’t know that was technically an inversion!) to the awe-inspiring handstand. No matter where you’re at in your practice, you can learn to do inversions. There’s an inversion out there for everyone — as long as you have the courage to try.
Why Should I Put Inversions in My Yoga Practice?
Inversions have a ton of benefits, and that’s why adding them to your practice can be helpful. Not only are they great stress busters, but they also have other positives such as boosting your immune system, relieving fluid build up in the limbs and even getting rid of varicose veins. Plus, you’ll feel on top of the world when you finally nail that headstand.
What to Know First
Yoga isn’t risk-free. As with any exercise regime, there’s a chance you could injure yourself during practice. If you have neck, back or shoulder injuries, you should avoid certain inversions as they may aggravate any existing problems. While it can be normal to experience some discomfort, you should never push yourself until it hurts. The phrase “no pain, no gain” doesn’t apply to yoga. Always honor your ability and listen to your body — pain is your body’s way of telling you something is wrong, and you need to stop.
Some Inversions to Try
Now that you know a little about inversions and why they should be part of your practice, check out the poses below to get inspired for your next yoga session:
Downward Facing Dog
It may be surprising that downward facing dog is an inversion but think about it: Your head is beneath your heart, thus putting you in perfectly inverted position. This is excellent news, though, especially considering most yogis tackle a downward dog early in their stretching careers. Just as a reminder, though, let’s go over the proper form for this particular pose. You’ll start on all fours before pushing your weight back toward your heels. As you do, your hips will rise into the air — you’ll feel your abs engage, too. Press your hands down to help push the weight from there into your legs for a full, inverted stretch.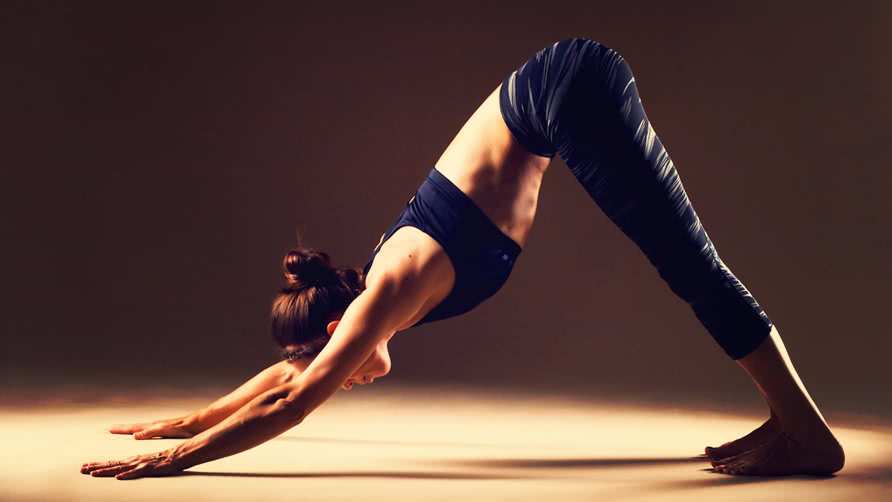
Photo: YouQueen
Dolphin Pose
Once you’ve mastered the downward dog, you can move into dolphin pose. This is a foundational move for your forearm stand, so it’s a great way to build strength before you’re ready to go entirely into an inversion. You’ll once again start on all fours before pressing back into your hips and legs — right into a downward facing dog, of course. The only difference is that your elbows and wrists will be on the mat. As you press your legs back into position, always keep your eye on the alignment of your arms. Make sure your wrists and elbows are straight and in line at all times.
Photo: Greatist
Shoulderstand
Not all stands require you to balance on your hands or your head. This one’s a lot simpler, but still provides the same relaxing benefits that come with all types of inversions.To get into a shoulder stand, you’ll start by laying on your back on your mat. Engage your core by lifting your legs so you look as though you’re folded in half, with your feet behind your ears — this is called plow pose. Then, straighten your arms and lock your hands together on the mat as you press your shoulders as close to your ears as you can get them. Once you’ve breathed through plow pose, lift your legs straight up into the air and find your shoulder stand. You’ll move your hands from their stretched, interlocked position onto your lower back to support your inversion.
Photo: BeYogi
Crow Pose
Crow pose is an inversion and arm balance all in one, albeit a beginner’s version of the tough-yet-impressive balances you’ll work toward with this strengthening move. You’ll start on all fours on the mat, keeping an eye on the spacing of your arms and hands — they should be shoulder-width apart. Then, spread your fingers to give you plenty of surface for balance and grip. Next, bend your elbows to create a triceps shelf, a flat surface on which your knees will balance. Then, you’ll push your weight back into your hips as you straighten your legs. Focus your eyes on something ahead of you to help you maintain balance as you shift the weight back onto your arms and hands. Beginners will likely take turns putting one leg into crow position at a time, working toward having both legs off the ground and balanced on the backs of their arms. Later, you can make crow pose even trickier by balancing to the side or straightening your arms.

Photo: Women’s Health
Seated Yoga Seal

Photo: Yoga Basics
Begin by sitting on your heels in hero pose. Then, exhale while bringing your arms behind your back and lacing your fingers together. Draw your shoulders away from your ears and press into your shoulder blades, lengthening through your chest. Exhale and bend at the hips and begin lowering your head to the floor. Now, inhale while lifting your hips up as you roll forward onto the crown of your head. Hold for two to six breaths before lowering your hips back to your heels, and then inhaling to a seated position.
Wall T-Stand

Photo: Yoga Journal
Start on all fours with your mat at the wall, and tuck your feet at the base of the wall. Lift your hips to come into downward dog, and place one leg against the wall at hip level, walking it up the wall if necessary. Step the other foot up the wall and level your legs. Hold for 3-5 breaths and try adding a few seconds each time you practice.
Supported Headstand

Photo: PopSugar
For this pose, you’ll want a folded blanket or thick mat to safely pad your head and forearms. Begin by kneeling on the floor. Then, lace your fingers together and place your forearms on the padded surface. Roll your upper arms out slightly and place the crown of your head on the mat. Press the bases of your palms together and nestle your head into your clasped hands. While inhaling, lift your knees off the floor and begin to walk your feet closer to your elbows, keeping your heels elevated. On your next exhalation, lift both feet from the floor. If necessary, you can bend your knees slightly and hop to get your feet up. Turn your thighs in slightly and press your heels toward the ceiling. The arches of your feet should align with the center of your pelvis and the crown of your head. Stay in this pose for 10 seconds on your first attempt, and add 5-10 seconds to the pose as you become stronger in it. Come down on an exhalation with both feet touching the floor at the same time.
Forearm Balance

Photo: PopSugar
Also known as ‘feathered peacock,’ this pose is an excellent strength builder. You can work your way into a forearm balance by starting in dolphin pose or a modified downward-facing dog. Once your palms and forearms are on the floor, your fingertips should be at the base of your practice wall. When you feel stable in that position, you can bend one knee and step that foot in closer to the wall, keeping the other leg extended. Now you can practice hopping into the pose to see how steady you are and where your body is comfortable. Kick off with the leg you bent, and sweep the extended leg in an arc toward the wall. At first hopping off the ground may be all you can manage, but with practice, you’ll eventually be able to rest your feet against the wall. Stay in this pose for 10-15 seconds before bringing your feet down one at a time and exhaling. Whether you’re new to the whole yoga inversion thing, or are just looking for some new inversions to spice up your practice, there are plenty of ways to put some upside-down time in your day. With a little patience and some practice, you can work your way up to some really impressive inversions. Just keep working at it, and soon even you will be surprised by your abilities.


Psychetruth has an excellent free app for yoga. I found it today. search yoga psychetruth and it should be the one that says yoga HD with a lady in black doing a pose.
Thanks for the tip, Christian!
Thank you for this amazing poses 🙂
Very helpful. I went for yoga training in India and did inversions but the explanation and meaning was not as clearly explained as your examples. After going through your explanations, I fully understand these inversions now. Thank you so much for sharing and I will make use of these explanations.